Category Archives: Blogger Stuff

Beeswax

Beeswax

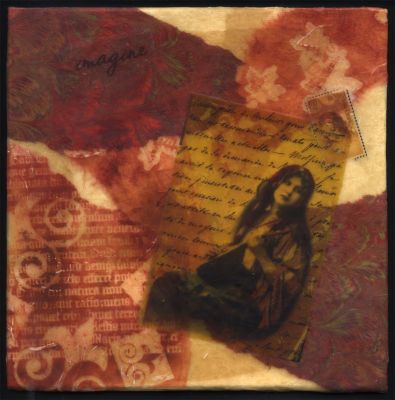
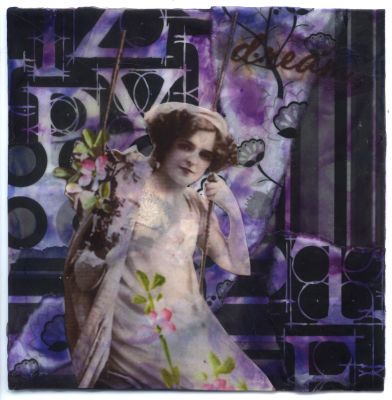
I’m behind on my posting of recent art so I thought I throw some pieces up real quick. These are some of the samples that I did for my last Technique Class. We worked with beeswax and the class turned out great. I looked around about 20 mins. before class was over and everyone was still hard at work, totally engrossed in what they were doing. That is a great feeling for a relatively new teacher like me. πŸ™‚

This is the first piece I did with beeswax. It was done on an 8×8 canvas panel. I wouldn’t really call it done so maybe I’ll work on it again someday.

I cut pieces of chipboard for my students to work on so I did a couple of pieces here to make sure the surface was good. The chipboard absorbs a lot of wax but it worked great for learning. These two are both 4×4.


I did another piece in my book for this class. I’ll have to post pictures of that one later along with the samples for the previous technique classes.

Farewell my sweet

Farewell my sweet

This morning, I took my Persian cat, that I’ve had for 10 years, to the vet. For the past couple of days, she has been lethargic and I haven’t been able to get her to eat. The vet ran blood work and discovered that Carrie’s kidney’s were failing. She recommended an ultrasound of the kidneys so I took her over to a specialist. I also called my mom so she ran up and met me at the ultrasound place. We found out from the ultrasound that Carrie had Polycystic Kidney Disease. There’s no cure for this and it is one of the things that happen to Persians a lot. Carrie probably had it since birth and we were lucky that she lived to be 10. About the only thing we could do was give her IV fluid which would make her feel good for about three days. But, my vet felt that then she would be right back to where she was this morning. We made the hard decision to put her down and not prolong any suffering. However, it is just the tip of the iceberg for my suffering.

[image:92:c]

So… Goodbye my sweet fluff. I will miss all your fur and way you would lie down on my pillow at night and cover my face with it. I will miss you wonderful purr and way you would drool on my hand when I pet you especially well. I will miss your funny little meow and how you never learned to retract your claws when you jumped in my lap. The way you would use just one little claw to poke me and wake me up in the morning. But most of all, I will miss how you always seemed to know when I needed you and how you were always in my lap before I even sat down.

Memory Cabinets

Memory Cabinets

I found these great little cabinets at Michaels recently on clearance. I showed them to the owner of the stamp store where I teach and she loved them so we got a bunch for an up coming class. I was inspired by the last Somerset Studio issue and just had to do some altered cabinets. So far, this is what I’ve come up with. I’m not sure how I’m going to structure this class but I’m sure it will be fun.

This one is my all white wedding them one. I have several great vintage wedding photos that I wanted to use. I also finally got to use some of that great old lace that my friend L. gave me. Yeah!

[image:70:c]

I love this new Crackle Medium that I used here. It works so well and very fast. No more waiting around overnight to see if something crackles. I’m sure I’ll be using this a lot.

I love this new Crackle Medium that I used here. It works so well and very fast. No more waiting around overnight to see if something crackles. I’m sure I’ll be using this a lot.I love this new Crackle Medium that I used here. It works so well and very fast. No more waiting around overnight to see if something crackles. I’m sure I’ll be using this a lot.

[image:69:c]

For this one, I wanted something darker to frame the main image of this cute little girl. It’s my fairy in a box design. πŸ™‚ The cabinets are about 5 1/2″ tall and were raw wood.

[image:68:c]

I painted the one with a wine color acrylic and let it dry. Then I went over it with a black glaze and wiped it off while it was still wet. It really looks like old wood.

[image:67:c]

My “Things”

My “Things”

This is my book for the “Things” round robin. I decided to do an Asian Travel theme for this book. I’ve wanted to do Asian for a while but hadn’t gotten around to it. This gives me a jump start on the book.

[image:18:c]

Here is my intro page. Yes, I know I spelled Asia wrong… I picked up the wrong stamp… Anyway, I’ll fix it when my book comes home. I added molding paste all around the edges of the pages and the map and then painted with blue acrylics. This page has the mailing route and my info.

[image:19:c]

Here is my sign-in page. I sewed fabric onto scrapbook paper to make the pockets for the tags and the big pocket on the left for my theme description.

[image:21:c]

Here you can see my sign-in tag and the theme pocket.

[image:24:c]

I only had time to do one spread before I had to send the book out. I decided to do one based on some Hindu images I have so that the other players would remember that Asia is not only Japan and China, but it is also India and Indonesia and much more. I tipped in a pouch that came with some incense to the center of this spread. I put a tag/book mark in the pouch.

[image:25:c]
The other sided of the pouch. I had this great postcard of a Hindu temple that a friend sent me from India years ago. I scanned the postcard and then printed it out on tissue paper. I inked or painted the book red and then put the tissue image down. I added silver rub on all around the edges and around the main image. I’m looking forward to getting my book back so I can play in it more.

More “Things”

More “Things”

Here are the spreads I did in Cheryl’s book. She had a sort of a vintage floral theme going on with her spreads so I tried to keep my stuff in the same vein.

[image:20:c]

This spread came together really well. The back ground is napkin and the yellow fuzzy stuff at the bottom is dryer sheet. I add copper Twinkling H2Os around the figure and then some copper rub-on around the rest of the page. I love the texture and depth that napkin gives a page. It is my favorite technique right now.

[image:22:c]

One of the “things” that Cheryl sent was a small foam stamp. I used it on this page with my fresco technique. I sent that stamp on with the book. It will be interesting to see how other people use it in their own way. The flowers on this spread are silk hydrangea parts. I add more gold Twinkling H2Os on the petals and around the page. The flowers were a lot of fun but I feel like this spread needs something else…

[image:23:c]

The other things Cheryl sent me were some blue tickets, like you buy for raffles, and this piece of shipping tape with “the Deuce” written on it. These things were really bright and didn’t go with my vintage theme at all so I collaged them with a bunch of different ephemera pages and scrapbook paper. Then I washed the whole thing with blue and white acrylic paint. I had this nice little heart going on in the center but I over worked it a bit and lost the heart. I think this spread needs something also but I’m not sure what…

Things Round Robin

Things Round Robin

Here are some spreads that I’ve done for an online round robin. The title of the RR is Things because every time we send a book on to the next person, we also send at least three “things” with it that the person must use in their spreads. The point is to challenge ourselves by working with materials that are different that our normal.

My Mom is also playing in this RR (actually, she is the one who invited me to join) and this is the spread I did in her book.

[image:27:c]

She choose a board book and no theme. Cheryl sent me the book and with it she sent: the hand painted paper with silver stars, the cheese cloth, painted fiber and the molded faces. I created the flowers with cut tissue paper and coffee filters that I dyed with food coloring. I got that idea from a couple of Lisa Vollrath Monthly Muse articles. The Monthly Muse is a great little digital publication that Lisa puts out with lots of articles and some great clipart.

Coptic book

Coptic book

I took a very nice class this weekend and learned how to do Coptic binding. Here is a photo of the book we made. It is about 4″ square. My top and bottom row of stitching are not perfect because I was missing a “loop” when I added the next signature. But, the middle rows look like beautiful little chain stitches. We figured out at the end what I was missing and I can’t wait to make my next book. I already have book board, cover fabric and an awl. All I need is the waxed linen and some needles with a big enough eye.

[image:71:c]

My black cover on black background is not perfect, I know. But, I was just too lazy to go find another background. Maybe next time. :)The instructor who taught this class is also doing a “before the book” class where we will learn the terminology and make a paper manger. I will definitely be taking that class also.

First one out of the way

First one out of the way

I’ve taught my first two classes now and they went wonderfully. Everyone did beautiful work and they all seemed to have a great time. It’s so nice to finally see this all come together. Now all I have to worry about is creating projects for my next classes. πŸ™‚

Here are a couple of pictures from the second class which was “Fresco” backgrounds. I didn’t have my camera with me for the first class. Sorry Mom.

[image:64:c]

 [image:63:c]

Here is everyone hard at work.

[image:65:c]

[image:66:c]

And, some student work.

First Class

First Class

I’m teaching my first class this weekend! I never thought I wanted to teach but ever since this opportunity came along, I can’t wait to give it a try. My first class is an advanced ATC based on my Tuesday’s Child cards. Here are the samples I made for the class.

[image:83:c]

 The owner of the shop where I’ll be teaching gave me some oversized playing cards to use as the base. So the samples are about 4″x6″

[image:82:c]

[image:84:c]

 And, here is the class display at the shop! I had to take pictures of my first ad. Yes, I know I’m a bit of a geek. πŸ™‚

[image:85:c]

Envelope Book

Envelope Book

I haven’t posted in a while so I thought I would throw something up. Here are some pictures of a little book I made out of envelopes last night. I made this for a sample for a class on image transfers I’ll be teaching in a few weeks. We’ll make a simplified version of this for the students to store their transfer samples in. It was tons of fun; I’m ready to make another one. πŸ™‚

[image:75:c]

The closed book.

[image:76:c]

Here it is unfolded. I used 6 envelopes to make the book.

[image:77:c]

The outside of the book. The folds at the top tab of each envelope were the weakest area. I ended up adding little chunks of the paper that I lined the envelopes with to the edges of each crease. This helped strengthen them up a lot.

[image:78:c]

[image:79:c]

[image:81:c]

Some close ups of the outside. When we do this in class, we’ll skip all the stamping and just color the envelopes. That way, we will have more time to play with transfer techniques. Then, after the students practice, they can add transfers to the envelope book if they want.

[image:80:c]

So the whole book will look more like the inside here. I haven’t decided about the lining of the envelopes yet. It really helps make the envelopes studier but it takes a lot of time.